Friday, January 26, 2018

Canning Bone Broth

Working on reorganizing my deep freezer has been kind of a process during the past couple days, because I was given over 20lbs. of beef bones this week. My Tuesday through Thursday involved making two large batches of bone broth and canning it!


Just add a few carrots (no peeling required!), some celery (leaves and all), onion chunks (only remove the very outer thin peeling), and a splash of apple cider vinegar and cover with water. Let simmer for 24 hours (or a little more), strain through a sieve, add salt and pepper to taste, and cool enough to skim off the fat. Unless you want a 1/2 inch or more of fat in all of your jars. I LOVE meat fat, but not in my broth. I'm not super picky on removing all of it though.

These bones had quite a bit of meat on them still, and I was able to salvage some nice chunks during the straining process. I know some of the flavor will have been cooked out into the broth, but the meat is still good enough to use in something like soup. I saved about 5 cups worth of meat scraps and plan to make borscht on Monday. I had a quart of chopped beets from our garden that I saved in the freezer specifically for a batch of borscht. You can find my delicious Russian beet soup recipe in another blog post here


I filled my pressure canner a record-full with my last batch. 19 pints! I purposely used a couple of my narrowest pint jars so I could get all of it in. I didn't want to have to put some in my refrigerator and have to come up with a way to use it later this week. Check it out! 10 on the bottom - 9 on top.

 (Note: a quick check just now revealed that apparently the manufacturer says it can hold 19 pints, so this isn't as great a feat as I thought. I know I couldn't have have fit 10 on the bottom if I used all Ball jars though. I tried.)


This was also the first time I got to try canning on my new (vintage) gas stove! I loved it. I actually had room for my giant canner, plus I didn't have to worry at how well the burner would hold that much weight. I definitely prefer canning on a gas stove!


By the way, if you're looking at investing in a pressure canner, I can not recommend more highly the All-American brand. It's not only heavy duty with handy wing-nut closure, but it has this awesome gauge that tells you how you're doing at maintaining proper pressure. No more having to listen so intently to the jiggle of the weight!


How is this view so satisfying?


Wednesday, January 24, 2018

Refrigerator and Freezer Cleaning and Organizing

Now that I've shown you my kitchen makeover (when I actually washed the hideous pile of dishes), I may as well keep going and update you on the rest of my house projects. I'm involving myself in a weekly "declutter challenge" that attacks a different area of the house per week. I'm loving that I get a whole week to take care of an area, because some of these weeks require more time for me to get the nominated task accomplished.   

*Moment of truth*: when I finally achieved my goal of clearing those kitchen counters a couple weeks ago, it wasn't just because I woke up one morning and told myself I was finally going to suck it up and get it done (after having it on my to-do list for a month), but rather because it just so happened to be the task for the first week of the declutter challenge. It was an extra help to know that other housewives around the world were working on the same problem area that I was. 

Fast forward to week three. This is the week to clean out the refrigerator and freezer. When I learned what area this week was, my first though was "well, at least my deep freezer is already organized", followed by a "don't they know I have more than just a little refrigerator-freezer?". My deep freeze is organized to a degree, but I've also acquired 50lbs of pork, 9lbs of ground beef, and a cow's worth of bones in the last week and a half, so it really isn't all that organized looking anymore. 

As far as the refrigerator, it was in desperate need of cleaning out. I had been making the excuse of there being snow on the ground, so I can't get out to the compost pile to dump out any bad stuff, plus I don't want to mess up the yard, to justify my putting it off for like... all winter. But since this was the task for the week, and the fact that the snow melted over the weekend, that was no longer a valid excuse. I was going to get it done! In order to keep myself from putting it off any further (you know, my habit towards last-minute stuff), I got right on it Monday morning!


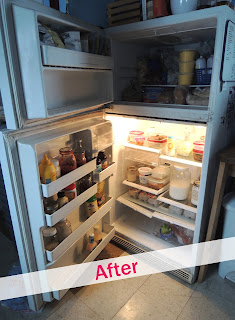
Why is it so satisfying to see a clean, shiny refrigerator? Is it because I know there is no longer a puddle of crystalized maple syrup under the crisper drawer? (Honestly, I had no idea it was even there until I pulled the drawer out to clean.) It's nice to know that every crevasse has been wiped down. 

Next area: the deep freezer. I just took the first batch of bone broth out of the cooker, and will start another this afternoon so I can clear that much space before I tackle the actual cleaning and organizing of the freezer. It will be easier if I don't have to wonder where to put a few large items!


Teaser:


Stay tuned - an after picture is coming! Plus, I'll be taking inventory of the freezer, so check back later if you're wondering what's hiding underneath the top layer of frozen goods. :) 


Friday, January 5, 2018

#lamehousewifegoals

My lame housewife goal for December was to clear all my kitchen countertops. I wanted a clutter-free kitchen where I could think and create! For me, having a clean kitchen equals happiness. I can handle some clutter elsewhere, but when my kitchen looks nice, I can still breathe.

I'm here to announce that I made my goal!

In January.

I accomplished the huge task this week. On January 3rd. It seemed like an impossible feat especially after welcoming the new year. We were out of town for the weekend, and had food to prepare right before leaving, which meant no time to clean up messes. These before pictures were taken after our return home, January 2nd. Oye. This is what a lived in house looks like, folks! It's a moment of reality. Truth. I am not a neat, picture-perfect blogging mom. I'm a meal-cooking, diaper-changing, errand-running housewife. And clearly, by the pictures, anything but a cleaner. (Honestly, I hate cleaning. But I love the results. haha)


This is my kitchen. Isn't it LOVELY? You can see it! Look at the beautiful wood pieces my husband built for me. You can actually see the toaster. There's room to cook! All of a sudden my teeny kitchen, with no counter space and no cupboards, feels like it has room. It's not as small as it seemed. And today, I am enjoying it. I just want to kick back on this beautiful wintery day and look at the outcome of my labor. 


Thursday, January 4, 2018

Cooking for a Crowd: Episode 13 - Christmas Chex

My Crowd Dessert day just so happened to be the same weekend as their Christmas Party, so we went right along with the festive occasion and served a fancy holiday dish.

Christmas Chex!

I've been working on using up odd ingredients that I have in my pantry, so this is where the idea sprang from. One random item sitting on my shelf was a big block of white vanilla bark. Generally people use this in place of white chocolate chips, for coating candies and such. It was given to me once upon a time, and I figured I'd use it by making truffles or something fun like that. Problem is, truffles are not the cheapest treat out there (hence why you only get three puny ones for a giant price tag at a restaurant), so I decided it was not a good choice for a crowd dessert. Knowing how easy it is to pop three in your mouth... and feeding 40 people... I'd have to make over 100 just to be sure everybody got some. That sounded like a lot of work, and a lot of money, so instead I googled "what to do with vanilla bark". I found all sorts of unhealthy recipes! I needed one that would yield enough dessert to serve everyone with the 24oz. brick I had, so the Christmas Chex mix that seemed to flood Pinterest looked like the recipe that would make the most out of the vanilla coating.


The recipe I used came straight from the Chex cereal website. (You can find it here: https://www.chex.com/recipes/christmas-chex-party-mix/) I adapted it a bit to fit my needs and preferences, like omitting the mini marshmallows (ew!), and skipping out on the sprinkles, since I didn't have any and it wasn't worth my time or money to get some just for the sake of fancy garnishing.

So my version of this recipe used 4 basic components. 

PSA!!! Please note: I did not say ingredients. There are way more than 4 ingredients in this dessert. Things like Cereal, Pillsbury dough, Cool Whip, and Condensed Soup are not ingredients, but food items made up of multiple ingredients. It is my pet peeve when people call processed foods like these ingredients. All too many times I come across recipes advertised as "Easy 4 Ingredient Casserole" or similar, when in reality it is four pre-made, pre-packaged, unhealthy items that you just open, dump, mix together, and bake. Such recipes are falsely named unless it literally is four ingredients such as potatoes, butter, salt, and milk. In which case you can just call it mashed potatoes. Thank you. 


Where was I? Oh yes, the four basic components: chex cereal, pretzels, vanilla bark, and M&Ms. It also has a small amount of powdered sugar for coating. I had to go out and buy the cereal, pretzels, and M&Ms, since I didn't have any on hand (and don't generally). Unfortunately I wasn't able to find chex-like cereal at the store I was hoping to (where cereal is almost reasonably priced), so I had to go elsewhere and pay the price tag. I was able to get the store-brand, which saved me quite a bit over the brand name Chex, though still more than I was anticipating. The box of cereal cost me $3.29, the pretzels were $1, and the M&Ms were on sale for $2.49/bag (I only used half the bag). So my cost (minus the small amount of powdered sugar, which I have no way of calculating) for this dessert is $5.53. 

Total cost: $5.53 divided by 40 = $0.14/serving.

The amount was perfect for the size group I was feeding! There weren't any leftovers because people kept munching while socializing after the meal, but it did take awhile for the bowl full to disappear completely. A note for next time, or for you if you happen to try the recipe, is to add the M&Ms while the candy coating is still soft. The recipe asks you to put the M&Ms on after the mixture has hardened, when you break it up and prepare to serve, but I found that they just wanted to fall through the cracks and hang out on the bottom of the bowl. Had I known this, I'd have skipped the M&Ms entirely, except I still wanted the color pop they offered. So remember: add candies when the vanilla bark is still soft (preferably sprinkle them on right after you've spread your mixture on the sheet pans to dry). This way hopefully they will be able to stick some to the pretzels and cereal.