Showing posts with label recipes. Show all posts

Friday, July 13, 2018

Summer Squash {plus recipe for zucchini patties}


We have been harvesting summer squash this week! 

This spring I planted four zucchini seeds, enough to supply us with some for fresh eating. About two days later my neighbor asked me if I needed any zucchini or yellow squash plants because she had a bunch she didn't need. I thought it would be nice to have some yellow squash to add another color to our summer meals, so I said I'd take one of them. Next thing I knew, my husband came across the yard with a 5-gallon pail full of plants from our neighbor! She didn't know which plants were what variety, so rather than guessing, she just sent them all.... 😳 And I planted them in my garden. All 16 of them. 

Because her plants had been started way before mine, they are a bit ahead, and have been bearing fruit already. I figured if nothing else I will be able to set up our roadside stand early to help get rid of some of it, since we don't need any more in our freezer.


But first, I have been trying to satisfy my cravings for fresh vegetables. One of my favorite summer dishes (although I've made it in the wintertime using frozen, shredded zucchini, too), is zucchini latkes, or zucchini pancakes, or patties, or fritters... whichever name you prefer to call them. A quick look on Google tells me Latke is more accurate, since most people add twice as many ingredients to their zucchini "Pancakes" as I do, while the recipes I've seen for Latkes are very similar to mine. A latke is basically just the yiddish word for pancake, although they usually make them from shredded potato, rather than grains like is popular for a pancake here in America. But I'll just call them patties, as I feel like that is meeting in the middle with a term everybody knows.

Now that we have that little tidbit of useless information out of the way, let me tell you how good these are!


They're addicting.

Need I say more? I have never tasted zucchini as yummy as I have in a zucchini patty. Not even fresh, warm zucchini bread slathered in butter compares. (Did I just say that?)

I was first introduced to them while under my parent's roof as a teenager, and I have no idea where my mom (or sister) found the recipe, but for years I didn't know of anyone else who made them. Then as an adult I spent a summer in Japan, and one morning I was served fresh zucchini pancakes as part of a breakfast smorgasbord, and they were as good as ever! They tasted just like how we made them back home, only my family always ate them with ketchup (except dad who likes his with applesauce), and in Japan we dipped them in soy sauce. Now when I make them myself I vary which dipping sauce I use depending on my mood. Either ketchup or soy sauce pairs nicely with these!


Here's how I make mine:


Zucchini Patties

1 medium zucchini, shredded
1 egg 
1/2 tsp. salt
1/2 tsp. onion powder
dash pepper
1/3-1/2 cup flour 

Stir all the ingredients together, adding enough flour to soak up moisture from the zucchini. The longer zucchini sits, the more water seeps out of it, so you may need to add more right before cooking. The flour also helps hold the patty together.

Heat skillet over medium heat until warmed through. Drizzle somewhat generously with olive oil to keep the patties from sticking. Drop batter onto preheated skillet, making each patty about 3-4 inches in diameter. Let cook until the bottom is brown and crispy and sides start getting cooked. Flip them over, and let the other side cook until done. 

Serve with ketchup, soy sauce, or eat as is!


Now my mouth is watering, and I really want to go cook up today's picking into some of these! Yum!


Tuesday, June 6, 2017

Cooking for a Crowd: Episode 4 - Chocolate Chip Cookie Bars {Recipe Included}


Here is it! My first dessert-themed Cooking for a Crowd episode. It has been a few months since I've been on the dessert rotation, but I'm back at it full time again. I realized as my turn approached that I have never calculated the actual cost going into my crowd desserts before. Baking often uses expensive ingredients such as butter, peanut butter, chocolate, nuts, fruit, or molasses, so it can be challenging finding a recipe for something sweet that doesn't make your budgeting attempts turn sour. Not knowing where to start, I figured a $5 budget sounded like a great goal. I had barely began running figures before I realized what kind of challenge I was up for. Both Aaron and my tastebuds agreed on cookies, and for you blog readers I wanted to stay in the realm of more traditional desserts, so you're not left feeling like you have to turn to something exotic in order to bake within your budget. 

Well what's more traditional than a chocolate chip cookie? I looked up a bunch of different recipes, but none of them were quite what I was looking for. I did find some great ideas though, and finally made my own recipe by comparing notes and adding some of my own touch.


Technically for a pan this size, I needed to use a 3 sticks of butter, which would've meant a cost of $2.25 for one ingredient! That would take up half of my budget. I needed to cut costs somewhere, so I decided to substitute half the butter for oil. But wait -- before you raise your eyebrows at the thought of oil in cookies, let me remind you of every other mouth-watering baked good that calls for oil. Cakes, muffins, brownies.... I hesitated at the idea at first (mainly because I knew I'd have to tell you all what I did), but recalling that most baked goods use oil instead of butter eased my mind enough to go ahead with it. By substituting 1.5 sticks of butter, I saved 64 cents. That may not seem like very much, but it's equal to the cost of a stick of butter. Plus, when you're working on a recipe with a final cost estimated between $5-$7, that's a 10% savings, which is pretty significant.

Another area I saved money was with the eggs. I found lots of recipes that had you divide them and only use the yolks, which I think is a waste of a perfectly good whole egg. If you're like me, whenever you have to divide an egg, you stick the other half in the refrigerator to use somewhere else only to end up forgetting about it. So in this recipe I only used whole eggs, which saved me another 18c. 


And finally, the other area where I cut my expenses was in chocolate chips. This might be a huge no-no for some of you chocolate lovers out there, but for those who are truly trying to reduce their grocery spending, you could save yourself quite a bit of cash by using less chocolate.

I bought the chocolate chips at our local bulk food store the day I did my baking, so I didn't have time to search for the best deal in town. They had regular-sized chips for $2.91/lb or mini chips for $2.62/lb. I chose the mini chocolate chips for two reasons: first, because they were obviously cheaper per pound than the regular size, but also because they would spread better throughout the pan, making it look like there are more chocolate chips than there really are. 

Comparing recipes again, I was "supposed to" use 4 cups of regular sized chocolate chips. The bag of mini chips that I had bought cost me $3 for 1.15 pounds, or 2 1/2 cups. There again, if I used the whole bag it would've been a huge cost for just one ingredient, so I decided to only use half, putting my chocolate chip expense at $1.50 for this recipe. Looking back, I feel like that was a good amount, but I would be hesitant to go any less than that. By using 1 1/4 cups of mini chocolate chips, there was just enough in each bite, but it didn't give you that extra gooey, loaded chocolatey center. So in my recipe below, I upped the amount to 2 cups to keep everybody happy. In being frugal, you don't want people to feel like you're ultra stingy or that they're being gypped. 


For serving, I cut them into 2" squares, making 48 pieces total. The one sheet pan was enough dessert for everybody (I was serving 40 people, for those of you who didn't catch that). They're such a great grab-and-go snack that we didn't bring home any leftovers. This amount would be perfect for a potluck, but if you're planning on serving them individually on plates, like as the main dessert for an event, I might recommend cutting them a little bit bigger. You'll have to decide what fits your needs best.

My total cost into the dessert was about $5.24. My original total would've been $9.36 if I hadn't cut expenses in butter, eggs, and chocolate chips. By looking for ways to reduce cost, I ended up saving a total of $4.12. That's 44% saved! What an exciting amount! 

For cost per serving, the total equaled 11c per square (and would have been 19c before savings). 


Monday, March 20, 2017

Eating Alkaline


In an effort to include more alkaline-forming foods in my diet, I've been experimenting with my own new recipes and reintroducing other yummy foods that I don't normally purchase on a regular basis. 

One of my more delicious meals features a knock-off oatmeal - made with millet, and enhanced with cinnamon, butter, and maple syrup. I kind of happened on it by accident. 
I thought I was cooking quinoa but didn't realize until I had eaten most of it that I had grabbed the jar of millet instead. I thought the texture seemed different but figured it was because I didn't cook it quite long enough (though I followed the directions... for quinoa), and it didn't click how vastly different the flavor was! You'd think I had never cooked either before. Well ... I hadn't, but I've eaten them both a few times in my day. 

The blooper ended up being much better, and I think a far more pleasing flavor too, than it would've been had I grabbed the jar of quinoa. The unfortunate part of this dish is after checking the two stores in town that sell bulk grains, I realized millet is hard to find, as neither carried it. I would guess the health food store in the "city" might, but I don't know. 

I'm not an oatmeal person (unless it's baked), so this discovery may add a nice variation to my old breakfast routine, which was most often just eggs and toast. Pairing the millet with an egg and grapefruit gave me a bit of protein and made it a well-rounded (pun intended) meal. Another reason I give this plate such a great rating is because I felt absolutely amazing all morning. Breakfast didn't sit heavy and lasted me well until lunchtime. 


Thursday, November 3, 2016

Fall Beets and Borscht {recipe included}


I tried something new this week! 

I made borscht, the delicious soup that makes us all think of Russia and its surrounding countries.

Though it was three months ago that I canned my beets, I left a few in the ground that were way too tiny to even make a pickled beet from. Those itty bitty beets grew to be nice big ones and I got a mini fall harvest the other day. Mini harvest, like... four or five nice sized beets, which is too little to process, but perfect for a couple of meals fresh! 

Back in my husband's days living under his family's roof, they had a Russian family live in with them for awhile. This was their recipe, which I acquired in a collection of "Recipes from the Farm" as a wedding gift from hubby's sister. 

It is a bit time consuming to make and you have to start it early in the day, but let me tell you ... the flavor is so worth it. It tasted so much better than I was expecting. I admit I was nervous because it was new to me and well, I didn't have a single picture to go by, so I had no idea if I was doing it right. Maybe I wasn't, but I am happy with the results nonetheless. 

I can't just tell you about it. It's time I post a recipe for you all, so I will give you my version of Borscht. The original recipe made a much larger batch, so I cut it in half and did a "give or take" on the exact amounts, because I didn't use a measuring cup, so don't be afraid to eyeball it. I bet Russian housewives do the same thing. I also was very cautious on the spices the recipe called for and added a few of my own on top of that, including the garlic, which I found was a staple addition to most other borscht recipes I've seen.


Tuesday, September 13, 2016

Grapes!

Grapes. This was my new experiment! We have a vine on our property that normally gives a handful or two of pitiful looking grapes. Over the weekend though, as I headed back from an evening walk to the garden, there husband and son sat happily munching. (It was absolutely adorable seeing Adam pull them off and stuff them into his mouth!) Aaron exclaimed at how the vines were loaded and it was a shame that they would have to go to waste. There were indeed a fair amount ripening, so I suggested grape juice. 


Something else had found the delicious fruit before us and left a scattering of skins behind, so we knew our chance to pick them was now. Grabbing a colander, I got as many as I could before dark. Often grapes are pretty buggy (at least ours are), so I had to do a fair amount of sorting when I got in the house. I'd say around 60% were good, useable grapes. 

My mom had made grape juice back home and let me tell you! That stuff was addicting. Every Sunday evening Dad would make popcorn, and that grape juice paired ever so perfectly! The recipe mom had was for filling half gallon jars, but being as there are only three of us in this household, we didn't need two quarts in one sitting. At least not now with how limited our grape production is. I had just over three cups salvaged, which was enough for three quart jars of juice. Three days that we will get to enjoy this delicious treat! 


Here's how I made it. Put one cup of grapes in each jar. Ideally you should have just over a cup per quart, but this is what I had. Add 2-3 Tbsp honey. (I accidentally added twice the amount per jar, as I was cutting the recipe in half but forgot during this step. The grapes weren't quite at their prime full-ripeness, so it probably needed a touch more sweetener, anyway.) If you wish to use sugar instead, add 1/4-1/2 cup per jar, depending on how sweet you think you'd prefer it. I like to be able to taste as much natural sweetness and flavor from the fruit as possible, so I normally try to aim a bit lower on the amount of sweetener added. Pour hot water into the jars until full, leaving a little bit of headspace. Process in a hot water bath canner for 10 minutes, let set for another 10 minutes before removing your jars, and done! (Note: if you used sugar and it hasn't completely dissolved at this point, simply tip the jar on its side.)


I can't wait to see how it turned out! I'll have to give you an update when we do open a jar to taste. That is, if I don't die from it's awesomeness. I'm counting on it being everything grape juice should.

Saturday, July 9, 2016

Baked Beans

My sister and brother-in-law called me earlier today to invite themselves over for a couple hours this evening. They said they'll bring the steaks to grill, so... there's no turning them down. They live a couple of hours away and were going to be almost in the area anyway, so we take them as visitors whenever they happen to be around!

I decided I'm going to make a few dishes to go along with the meal. Baked beans. They just sounded good to me. I don't know if it's because it was lunch time, because I'm pregnant, or if that's just what I have on hand and it goes well with meat, but they sure sounded appetizing. The problem was I didn't feel like a had a ton of time to prepare them so I decided to skip a step and not use a recipe. It's too much work finding one I think I might like! Besides that, a quick trip to Pinterest told me that most people's bean recipes call for canned pork and beans. Can somebody tell me why? I thought pork+beans was basically pre made baked beans? I guess it doesn't make sense to me. I generally only have raw simple ingredients on hand, so my only option was to start from dry beans. 


I didn't measure the beans. I said I was just going to throw something together, so I poured in what I thought might be enough, added water, and started cooking. Meanwhile I mixed a few random ingredients that I thought might be good in baked beans. Homemade ketchup, molasses, maple syrup, dry mustard, and salt. When the beans had finished cooking I reserved the bean liquid, salted the beans, mixed in my concoction, added some chopped onion, and poured enough bean juice back in to reach the desired consistency. Of course I taste tested them to make sure I was satisfied. A couple spoonfuls later I decided it not only was good enough, but I didn't make as much as I should've. I'm sure I consumed my portion already. I had to stick them in the oven to bake pretty quick just to keep my spoon from dipping back in. I have the oven set somewhere between 325-350* and plan to bake them for 3 hours. It really helps the flavors blend when you bake them over a longer amount of time. You just need to make sure they don't dry out in the process.


Now to torture myself with the aromas floating from the kitchen for the next hour or two. 

I think the no recipe was a success, but we'll have to wait for the final taste post-baking to double check. ;) This is how I cook. It's no wonder after being married over a year my husband still told people I hardly made the same dish twice!


Friday, April 22, 2016

Homemade Butter


Milk, yogurt, cheese, and butter have been plentiful in our house lately! We rarely have enough dairy products to keep us satisfied. Somehow it always gets consumed shortly after making it through the doorway. Well, try getting a cow! Or better yet, have your brother take care of one. I can't tell you how many gallons we've gone through in the past two weeks, but we have certainly had our fill!

Allow me to introduce you to homemade butter. It's so good I could eat it plain. For real. And this stuff is so easy to make! I have made a fair amount in my day using food processors, electric butter churns, and also by hand. The method I'm going to teach you uses a simple canning jar - by far the best, most efficient method I have come across when you have less than several gallons of cream on hand.


First off, you're going to need to separate your cream if it isn't already. I skimmed mine off the top of several gallons of milk. Place the amount you want to work with in a jar and heat to 70*F. It is really important that your cream is this warm, as it will cut down your butter making time tremendously! I split my cream amounts so my jar wasn't more than half full, and ran it under hot water until reaching the desired temperature.


Next step is shaking! Mix it, shake it, swish it back and forth. You may have noticed my little man's feet sticking out from behind me. He actually fell asleep while being jolted around!


You're going to shake it until it starts to separate and get transparent looking. You'll notice yellow bits of butter forming. At this point, you may want to shake it just a little bit longer, gently, just enough to bring the little bits together some. If you have really warm cream it will look greasy, and the more you shake it the greasier it will get. I guess you'll just have to keep an eye on it. When it looks like butter, you're good. Just make sure the bits can hold together and won't wash away when you start the rinsing process.


Rinsing Method #1


Pour the buttermilk into another jar or container and save for later. It makes some mighty tasty buttermilk biscuits! I just separate the buttermilk through a crack in my lid. Less dishes to wash that way! That's definitely a goal when I'm in the kitchen. :) Dump the butter into a bowl.


Next comes the rinsing. Your goal is to get all of the buttermilk washed out, as it helps the butter last longer. Buttermilk sours before butter, and will sour the rest of your product sooner if you don't wash it out. Because this is a natural product with no preservatives, it will naturally sour sooner than grocery store butter, but by washing it we are doing our best to help it last as long as possible.

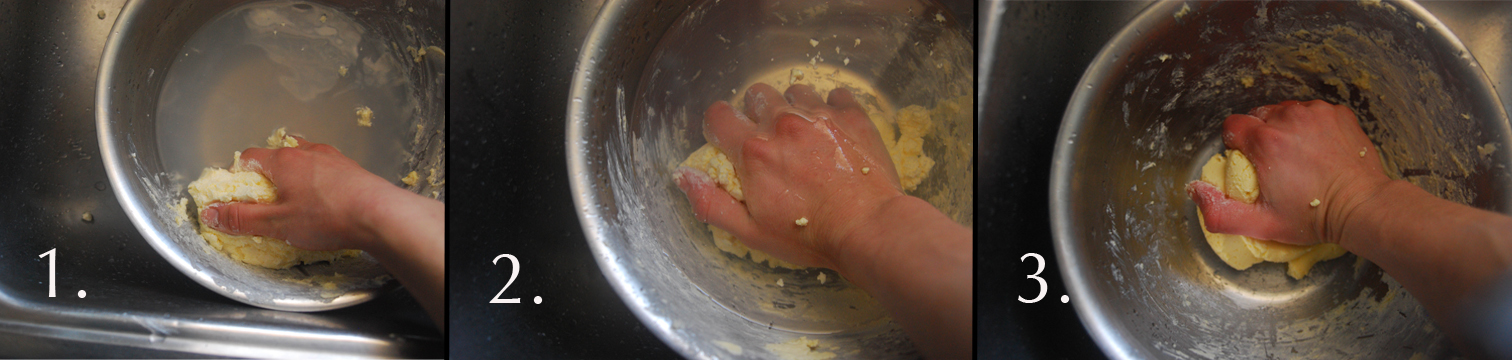
Simply pour water over the butter and squeeze it back out. You can see I am working under water while I'm rinsing it. I use cold water to try to get the butter to harden some so it's easier to work with. Your water will be really cloudy at first, so dump it down the drain and pour more fresh water in. When I rinse my butter, I use a bread-kneading motion. Squeeze, turn, press, whatever it takes to make sure the buttermilk washes away. You're going to need to keep redoing your water as you work. When you can squeeze and the water no longer turns cloudy, your rinsing is done. Dump out the water, give your butter a final press, and salt it to taste, kneading it in so it spreads throughout.


Rinsing Method #2

At the advice of my husband, this post isn't complete without including another method of rinsing. Though I've made a some butter in my days (which ended up on store shelves across the lower half of Michigan), Aaron is the butter master. He has far outdone me in its production! Using an old-fashioned hand butter churn, he and his brothers have made hundreds of pounds of this stuff. They perfected the art. (He's the one who taught me the butter needed to be at 70* for ideal churn time, years before we were even interested in each other.) This is the method he used with the churn, only I'm going to teach you using my handy canning jar.


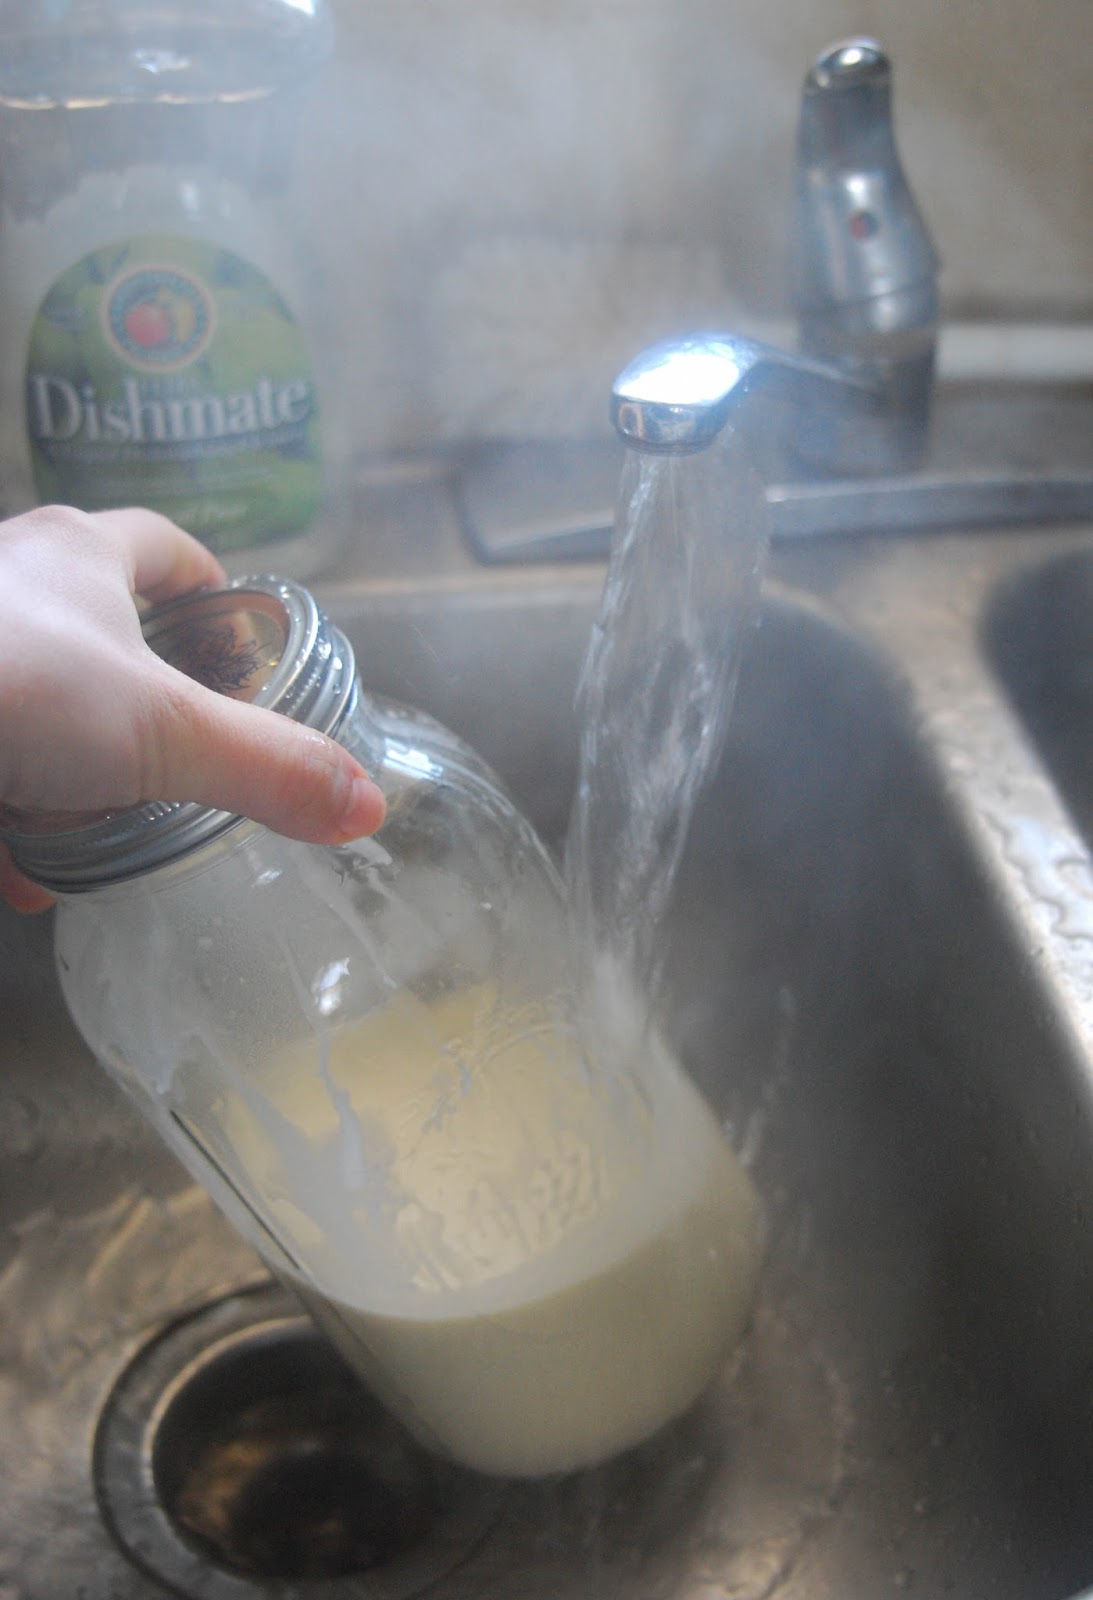
When your butter has started clumping together, pour the buttermilk into a container to save for later use. Instead of dumping the butter into a bowl, you're going to do all the rinsing in your jar. Pour cold water into the jar and give it a few good shakes. The water should be really cloudy. Dump the milky water out (you're done with it), and add more cold water to the jar of butter. Repeat this process until the water stays clear even after shaking. When all the buttermilk has been rinsed out, pour the water off and transfer the butter to a bowl. Squeeze all the remaining water out. Remember you want it as dry as possible so it keeps longer. Salt to taste, kneading and working it in so it's salted evenly. If you're like me, you'll sample it to make sure!


After rinsing:


Mold into desired shape, and you're all set! 
With about a quart of cream I ended up with 8.3 oz. (1/2 pound) of butter. 


Next step is testing it out on some nice fresh homemade bread! If you don't chow it down as soon as you've slathered it on, it's really good with home canned strawberry jam, too!